Do you want to enable WordPress debug mode on your website? Here in this article, we will guide you to enable the WordPress debug mode.
WordPress is one of the popular content management systems at this moment with lots of advanced features and functionalities. With advanced features, it is very common for most users to face some errors and bugs with WordPress. When an error occurred on your WordPress website if you know the reasons for that error you can easily fix it. It can save a lot of time. On the other hand, if you are not aware of the reasons it makes the process difficult to fix an issue or bugs.
WordPress debugging mode will help you to troubleshoot and find out the reasons for an error in an easy way. This article will help you learn about the WordPress debug mode and also guide you to enable it on your website.
What is WordPress debug mode?
The debug mode in WordPress is a process that helps the developers to find out errors, threats, warnings, and other programmatic bugs caused by PHP on your website. WordPress is built with PHP, HTML, CSS, JavaScript, and others. So it is very common to get a programmatic error.
There are many reasons you can face errors in your website like –
- PHP memory limit
- Add wrong custom code
- Themes or plugins conflict
- Update WordPress error
There are too many WordPress errors available. WordPress doesn’t have any default features to check and identify all the errors and conflicts. It takes your time to check all the issues manually. Here the WordPress debug mode will help you to identify all these errors. After enabling the debug mode WordPress will show you all the error log on the admin dashboard. This will help you to monitor all the error activity instantly so that you can take steps quickly to fix the error. So let’s how to enable the WordPress debug mode.
Enable WordPress debug mode
There are two different methods to enable WordPress to debug mode.
- Manually
- Using a plugin
Enable debug mode manually
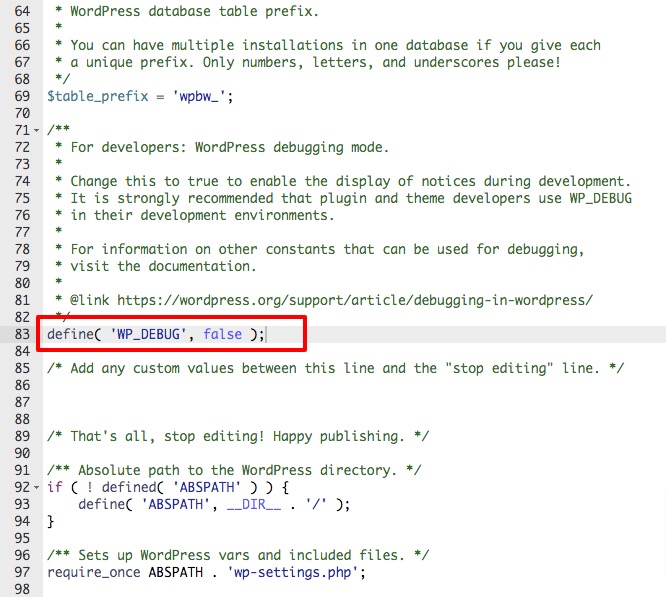
If you have basic coding knowledge then you can follow this process. In this process, you need to edit your website’s wp-config.php file on your website. You just need to add a few code snippets on the wp-config.php file. To access the file you need to connect your website with an FTP client or Cpanel.
Login to your website Cpanel account and then go to the file manager option. From the file manager go to your website file directory. You will find the wp-config.php there.
Now open the file and add the following code at the end of the file.
define( 'WP_DEBUG', true );
But if your wp-config.php has already the debug code set as false then you don’t need to enter the code again. You just need to change the false value into true. It will enable the debug mode.

This will enable the error log for your website backed and frontend. That means your visitors can also see the error log. That’s not a professional way to display the error log to your visitors. So you need to hide the error alert from your frontend.
To hide the error log from the frontend just add the following code on the same file again.
// Save debug.log to /wp-content/debug.log

define( 'WP_DEBUG_LOG', true );
// Hide errors and warnings

define( 'WP_DEBUG_DISPLAY', false );

@ini_set( 'display_errors', 0 );
This will just show the error log only in your backend dashboard.
Enable WordPress debug mode using a plugin
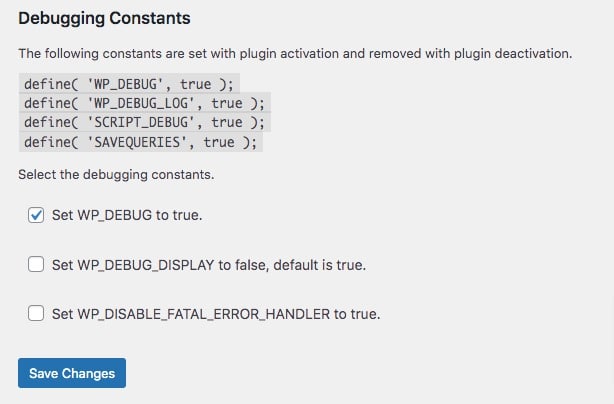
If you don’t want to add code to your website then using a plugin is the easiest and quickest solution for you. Hee in this tutorial we are using the WP Debugging WordPress plugin. Install and activate the plugin and go to Tools > WP Debugging page to configure the plugin.

The plugin will automatically add the enable debugging mode code to your website’s wp-config.php file. Here you will find three different options. We will recommend you to choose the WP_DEBUG_DISPLAY to false, default is true” this will show the error log on backed and hide the log from the frontend.
Wrapping up
Following the process, you will be able to fix enable the WordPress debug mode on your website. You can see our other articles to learn How to get a free SSL certificate for WordPress website
How to add an admin user to the WordPress database via MySQL
How to add a PDF viewer in WordPress
We hope this article will help you. If you like this article, please like our Facebook page.

