Looking for a way to manage product attributes in WooCommerce? Woocommerce is one of the best WordPress plugins for online stores. It offers you so many features and functionalities to manage your products and sell them online. When users search for any product on your website, they need to check many things. They need to compare one item to others and also look for other variations of that product like size, color, features, and many other factors.
WooCommerce gives you the opportunity to manage your products with different variations by using attributes. So here in this article, you will show how easily you can add and manage product attributes in WooCommerce.
What are Products Attributes In WooCommerce
Attributes are the features that add extra data and information about your products. It is also helpful for filtering and searching. If your products have different attributes, it will be easier for your customers to search for any specific products they want.
Many people are confused about variations and attributes, but they are not the same. Variations have nothing to do with searching and filtering. Variation helps too, choose from different options like different colors or sizes. Variations are based on attributes. Creating attributes is an essential first step before creating variations.
Setting Up WooCommerce Attributes
Suppose you are selling mobile devices in your online shop. You are selling different brands, different models, and different features: for mobile. So that your customer can choose the perfect device for their needs. You can do this by adding attributes and adding variations using those attributes.
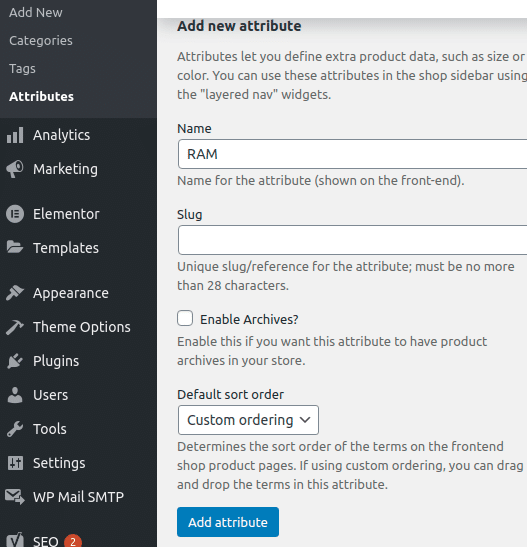
To set up distribution login to your WordPress dashboard and go to Products > Attributes. By default, you don’t have any attributes. Suppose you need to add attributes based on your mobile device’s RAM version.
- Add the attribute name “RAM”.
- Slug will automatically be created, and we can leave the rest of these options untouched.
- Click the “Add attribute” button and your attribute will be added.

Configure The Attributes
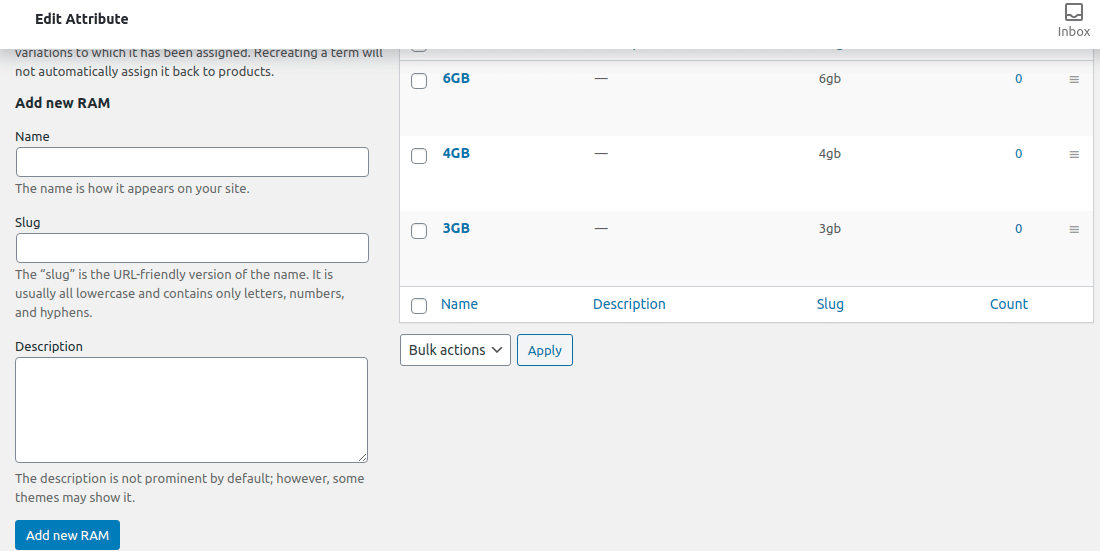
After creating our attribute RAM, now we can add different RAM versions to your devices. Click on the Configure Terms option.

Now add our different RAM versions. We can add all the versions at a time.
- Enter the RAM version
- Add some short description
- Click on the Add New Ram tab

If you now go to the attribute page then you can see your recently created attributes and their variations.

Add Custom Attributes to Individual Products
Sometimes it is important to add any custom attributes for unique products as needed rather than going through the above-described procedure of setting pre-configured attributes. When you have different products with different attributes then you need to add custom attributes for individual products.
- Go to the WordPress dashboard.
- Select the specific products.
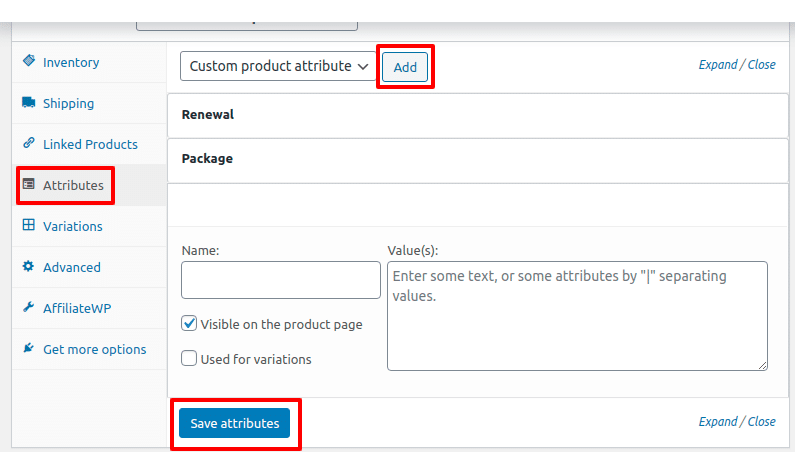
- Scroll down to the Product Data section and find the attributes option
- Click Attributes. The drop-down menu for “Custom product attribute” is already selected. Click Add.
- Name your attributes and add values.
- Save attributes

Wrapping Up
This process will help you manage your products in your online shop. You can see our other articles to learn Reasons WordPress is the best option for eCommerce.
Best WordPress WooCommerce Themes To Start Your E-Commerce Business With In 2022
Web development trends in 2022
We hope this article will help you. If you like this article, please like our Facebook page.

